

Gluten Free Waffle Cones
These are amazing! Just because you have to eat gluten free doesn’t mean you have to live without – here is the perfect example!
A regular waffle iron won’t work for making cones since the depth of the depressions are too large – this would make the waffle cones way too thick, and they wouldn’t crisp up properly. If you don’t have an actual waffle cone iron (and who does!), a panini grill will work just as great.
Begin by creating the form to shape the cones: roll a piece of 8×10 cardstock paper into a cone shape and secure with tape. This is what you’ll use to roll the warm waffle around. Next create another form that is larger that you can put the rolled waffle cone into to cool. You can use a few layers of cardstock, or use a piece of plastic (I cut up a thin plastic cutting board sheet). For the plastic form, punch a hole in the top and bottom and secure the cone shape with a twist tie.


Beat cream with a mixer until soft peaks form. Stir in extracts, set aside. Sift together the remaining ingredients then fold it into the whipped cream. Cover bowl and chill 30 minutes.


Heat panini press to 375°F (med-high), then add 2-3 Tbsp of batter to center of the greased press and close lid. Depending on the press, the waffle should be a deep golden brown after 90 seconds – 2 minutes. Use a spatula/tongs to lift waffle up and place on clean towel.


Carefully wrap the waffle around the smaller paper cone.
Immediately place the rolled waffle into the larger plastic cone form to cool and harden. Shake the waffle a bit so it opens up more at the top, and the bottom will get tighter. Place the whole thing in a cup so it remains upright until the shape has hardened enough to remove the forms (about the time it takes to get another waffle ready). Be sure to clean grill between waffles if burnt bits start to build up.
Alternatively, drape the warm waffle over a small ramekin dish to create individual waffle bowls!


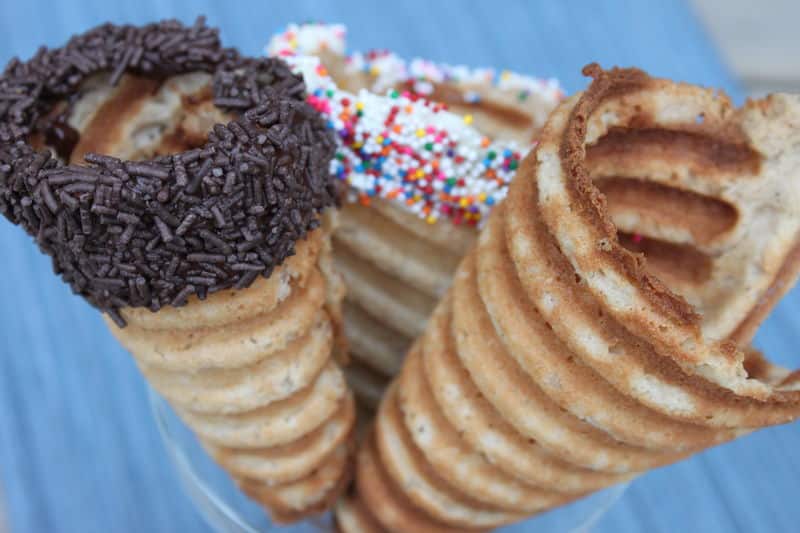
For added decoration and flavor, spread melted chocolate around the rim and sprinkle or roll in gluten free sprinkles. To the keep ice cream from dripping out the bottom (since its hard to get the end completely closed and tight when rolling/cooling), allow the melted chocolate to cool slightly so it has a thicker consistency, then spread over bottom opening. Once it has harden it will be the perfect seal!


Note: For a dairy free version, you can try using canned coconut milk to replace the heavy cream. Although we have not tested the recipe using Dairy Free Whipped Cream, it should work just fine. Please let us know how it turns out if you try!

Waffle Cones
Ingredients
- 1 cup heavy cream
- 1 tsp vanilla
- ½ tsp almond extract
- 1 ½ cups GFC Flour Blend for Baking
- 1 ½ cups icing sugar
- 1 Tbsp cornstarch
- 1 tsp xanthan gum
- ¼ tsp cinnamon
- Pinch nutmeg
- Pinch salt
Instructions
- Begin by creating the form to shape the cones: roll a piece of 8x10 cardstock paper into a cone shape and secure with tape. This is what you’ll use to roll the warm waffle around. Next create another form that is larger that you can put the rolled waffle cone into to cool. You can use a few layers of cardstock, or use a piece of plastic (I cut up a thin plastic cutting board sheet, or use something like a plastic milk jug). For the plastic forms, punch a hole in the top and bottom and secure the cone shape with a wire or twist tie.
- Beat cream with a mixer until soft peaks form. Stir in extracts, set aside.
- Sift together the remaining ingredients then fold it into the whipped cream. Cover bowl and chill 30 minutes.
- Heat panini press to 375°F (med-high), then add 2-3 Tbsp of batter to center of the greased press and close lid. Depending on press, the cookie should be a deep golden brown after 90 seconds – 2 minutes.
- Use a spatula/tongs to lift waffle up and place on clean towel. Roll the waffle around the smaller paper cone, then immediately place the rolled waffle into the larger cone form to cool and harden (remove the paper form now). Shake the waffle a bit so it opens up more at the top, and the bottom will get tighter. Place the whole thing in a cup so it remains upright until the shape has hardened enough to remove the plastic form (about the time it takes to get another waffle ready).
- Clean grill between waffles if burnt bits starts to build up.
- Once the cones have completely cooled, brush melted chocolate around the rim if desired and sprinkle or roll in gluten free sprinkles. To create a 'plug' in the bottom of the cone so the ice cream won't drip out, allow the melted chocolate to cool slightly so it has a thicker consistency, then spread over bottom opening.
Notes
Makes 10-12


Would this work for canolli deserts? Wouldn’t a pazelle plate work better? Some waffle irons come with pazelle plates.
Yes a pazelle plate would work great, they have very shallow ridges – perfect for making waffle cones. I wish my waffle iron or panini press came with that plate, oh the cookies I could make 🙂 !